Unsupported devices
IT Services does not provide formal support for Chromebook or Linux devices.
Chromebooks and Linux Devices
Please be aware that we do not support Chromebooks or Linux-based systems.
Chromebooks are intended primarily for online use and generally have lower hardware specifications. They do not install software in the traditional manner and as such we do not recommend them due to limitations in their functionality.
Similarly, Linux devices may present compatibility issues with certain software and support tools we use. As a result, we are unable to guarantee full functionality or provide technical support for either systems.
The guidance provided below is intended as basic self-help only. If the steps outlined are unsuccessful in establishing a connection, no further troubleshooting or technical assistance will be available.
To complete the connection, you will be required to enter your Loughborough University Username and Password.
This section will guide you on how to connect your personal device to the University wireless network "eduroam".
Please be aware that you will need to login as the main user account on the Chromebook before completing the following instructions. You will need to join the setup-wifi network. When connected to the setup-wifi, if you open a web browser you will be redirected to a page which will help configure your device.
Connecting to eduroam
setup-wifi
To connect to the setup-wifi, turn on the Wi-Fi by clicking on the time in the bottom right corner and selecting "setup-wifi" from the list
AUP - Acceptable use policy
Enter your Loughborough credentials, and accept the AUP (acceptable use policy)
Certificates
If you have previously connected to eduroam you can review your devices and delete certificates which are not in use
- If you are using an existing device, select the device name from the list and click Continue
- If this is a new device, select This is an additional device and fill in the Name for the device field and click Continue
Go to Downloads Folder
Cloudpath will detect the device as Chrome OS.
Click Step 1 to download the Network File – DO NOT OPEN THIS FILE
Configure and connect
Follow the instructions outlined in Step 2:
- Open a new tab in Google Chrome
- Type – Chrome://net-internals/#chromeos
- Under then menu Import ONC File, click Choose File
- A pop-up window will open, select the downloaded eduroam.onc file, and click Open – wait a few seconds (nothing will pop up if it is successful)
- After a minute, try to connect to eduroam, by going into your device’s Wi-Fi settings and selecting eduroam
- If the certificate was successfully setup, the device will connect to eduroam
Finally, forget setup-wifi
Once connected to eduroam, it is worth forgetting setup Wi-Fi network, this will ensure it does not try to connect to setup-Wi-Fi in the future
- Go to Settings > Wi-Fi
- Tap the (i) next to the Wi-Fi network that you want your device to forget
- Tap Forget This Network and then tap Forget to confirm
To connect to eduroam, your device must authenticate against the University's authentication servers. There are a few different ways to achieve this:
Preferred
- EAP-TLS. We issue your device a certificate, which your device then uses to authenticate itself.
Optional
- PEAPv0 with EAP-MSCHAPv2. PEAP provides an encrypted tunnel inside which different authentication mechanisms can be used. The most common is MSCHAPv2 which is a challenge using your University username and password. Or:
- EAP-TTLS with EAP-MSCHAPv2. Similar to PEAP however the encrypted outer tunnel is TTLS.
Additionally, to ensure your device is communicating with genuine Loughborough University authentication servers, and not a rogue server, your device should be configured to verify the server. This is achieved by using the Loughborough University Authority certificate to verify the server certificate presented by the authentication server and checking the CN is equal to radius.lboro.ac.uk.
Finally, as eduroam is a global system used at most Universities worldwide, you need to configure your device so that your authentication is routed to Loughborough University's authentication servers. This is achieved by the outer identity (sometimes called anonymous identity) ending with @lboro.ac.uk or (if you don't configure an outer identity) the username ending with @lboro.ac.uk.
Step 1 - Obtain a certificate from cloudpath to authenticate your device
- In a web browser go to https://cloudpath.lboro.ac.uk/ and login using your University Credentials.
- On the final page click 'Show all operating systems'.
- Click on 'Other Operating Systems'.
- For Step 1, click on 'PEM' to download the Loughborough University Certificate Authority certificate move the CA certificate to the CA store on Ubuntu locate at '/etc/ssl/certs/'.

- Ignore Step 2.
- For Step 3, Click 'PEM' to download your device certificate, then click 'PVK' to download the private key for the certificate REMEMBER - keep the private key safe and do not share it.
Optional - change the password on the private key. Your private key will be unlocked using your University password. If you don't want this in clear text in the config file you can change the password to unlock the private key using openssl.e.g.

Step 2 - Configuring Ubuntu 24.04 LTS using GUI to connect to eduroam (using EAP-TLS)
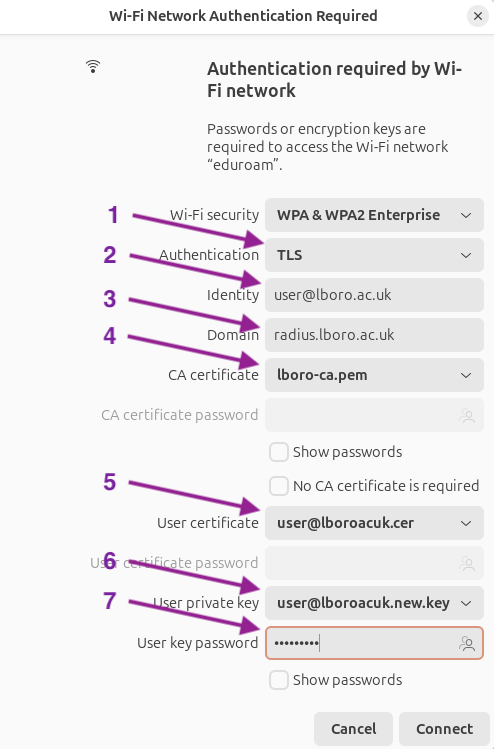
- Authentication type should be set to TLS.
- Identity is your university username with @lboro.ac.uk e.g. user@lboro.ac.uk
- Domain is radius.lboro.ac.uk
- CA Certificate is the Loughborough University Certificate Authority certificate downloaded from cloudpath in Step 1. In the example, the file has been renamed to lboro-ca.pem.
- User Certificate is your device certificate downloaded from cloudpath.
- User private key is the private key for your device certificate downloaded from cloudpath.
- User key password is your university password used to unlock the private key. If you have replaced the password for the key (see above) enter the new password.
Alternative step
Step 2 - Configuring Ubuntu 24.04 LTS using the command line to connect to eduroam (using EAP-TLS)
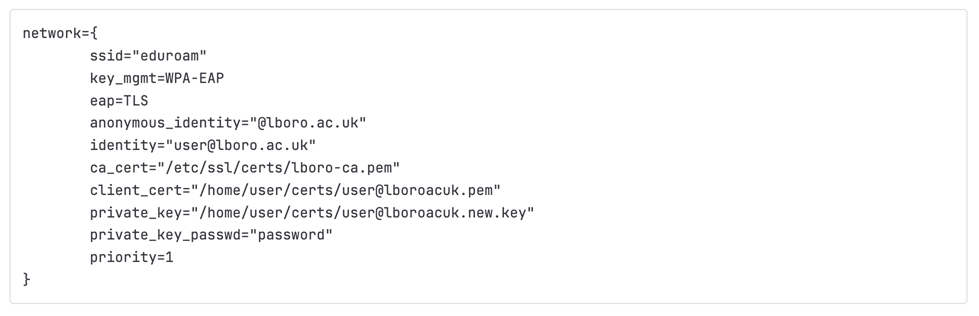
Configure eduroam using netplan
1. Get the name for your wireless adapter e.g. wlp0s20f3.

2. Edit the netplan configuration file called 50-cloud-init.yaml (using your preferred file editor).

Modify the 'wifis:' section of the file to add the eduroam configuration. In the example below the client certificate has been stored in /home/user/eduroam-certs. The CA cert downloaded from cloudpath has been renamed to lboro-ca.pem and moved to '/etc/ssl/certs/'.
The identity field should contain your Loughborough University username followed by @lboro.ac.uk  NOTE: You only need to edit the wifis: section of the configuration file. Do not change any other values.
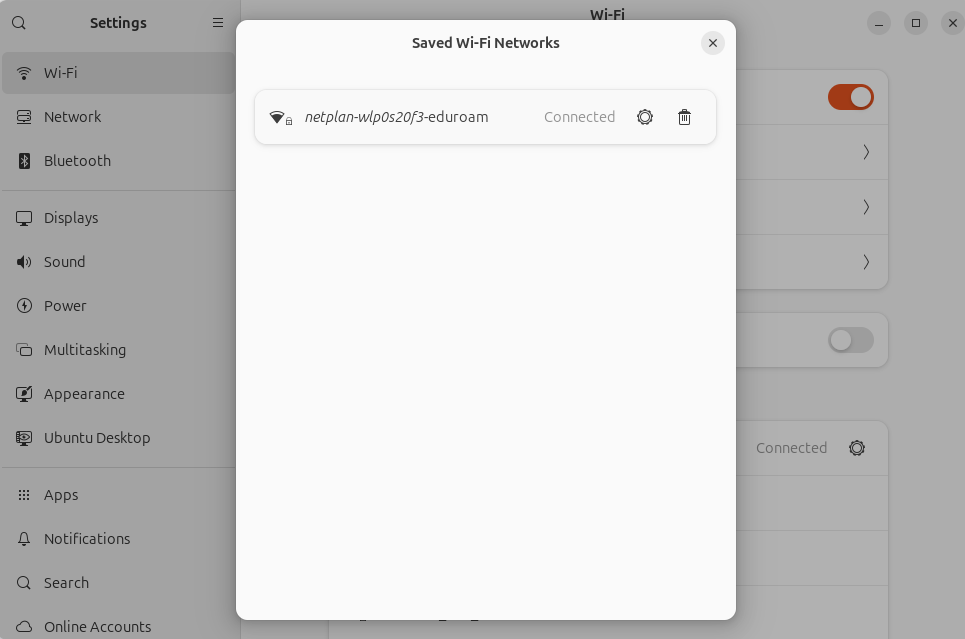
3. Apply the config using netplan

After applying your configuration should be visible in the saved wireless networks.
Linux users using wpa_supplicant
Many versions of Linux use wpa_supplicant with a config file. If your version requires you to edit wpa_supplicant.conf add the following section to your config file:
How to connect my Linux device to the wired network in Halls
The following guide has been written using Ubuntu 20.04, and is provided on a "best efforts" basis only. Other Linux distributions will differ slightly in the location of the Applications.
These steps will guide you through configuring your device to use the network in your hall. If you have any problems connecting, please contact the IT Services help desk.
There are three stages to connecting to the wired network service:
Step 1: Network (Set-up networking on your device)
Step 2: Update (Update your operating system)
Step 3: Register (Registering your device)
Plug in network cable
Connect the Ethernet cable to your device and the socket on the wall in your room. If your room has two, then generally it’s the left-hand socket.
Network Settings
The default network settings are likely to be correct, but we would suggest going to your Network Connections, selecting the ethernet (usually called eth0) and choose edit.
Set Ipv4 connection settings
Ensure the Ipv4 connection method is set to Automatic (DHCP).
Update your Operating System
To help prevent your computer becoming infected with malware and viruses, you need to keep both the system up to date as well as your Anti-virus.
Updates – Open the "Software Updater" and run any available updates. Alternatively, open a terminal and enter the following command to check for updates sudo apt update
Antivirus – Please ensure you have an up to date Anti-virus package installed.
Find your MAC Address
Alternatively, manual registration can be completed by connecting to the network in your room, opening your web browser and following the instructions.
To find your MAC Address you will need to do the following:
- Open the Activities overview and start typing Network
- Click on Network to open the panel
- Choose Wired from the left pane
- The MAC address for the wired device will be displayed as the Hardware Address on the right
Once you have your MAC Address, you must now register it using the link below.